Countdown to Preparedness, week by week planning and preparing

Homesteading & Country Living Forum

Help Support Homesteading & Country Living Forum:

This site may earn a commission from merchant affiliate links, including eBay, Amazon, and others.
Weedy,

I agree, organizing is good to the point of being essential. Everything is useless junk if you can't find it. That includes food.
Organizing and then knowing where it is. You can have a dozen bins of fabric, but if you can't figure out which bin it is in, it is useless. I really like to inventory my bins. If they are see through bins, I print out a page and put one inside both ends. I've done the same with food stored in quart jars that get stacked up. I print out lists of what is in each box. If the bins are the black sturdy kind, I print out a much smaller list and tape it to the ends.
I also do this with materials for home maintenance. I have a couple bins for painting tools. I also have electrical bins, and others.
 
I am finding this thread inspirational, I have drawers in my old tool boxes that need to be cleaned out and I have filing cabinets that could help me organize if I just spent an hour or 2 on them. I do like the "small bites" approach the challenge is providing, it may help me finish eating this elephant....
 
I had previously said that I am going to do the weekly update on Sundays and here we are, week 3.
I can tell you that the challenges for the first two weeks are still challenging me. Week 2 could take me all year, but I will keep at it.

What if you cannot finish with a week in a week's time, maybe due to finances or other demands. Me? I'll work on a the week until it is finished and then move onto the next week.
A week's worth of groceries that is on the list might be more than some can afford. I have yet to shop for week 1's grocery list and it is not about finances. I need to get the shopping list ready so that when I do have time to go shopping, I will have it. I have been to the store, but didn't have the list, except in my memory.

And I am not done with all of my inventory from week 1, let alone the purge for week 2.

I know that some of us will substitute some things. That oatmeal from week 1 in a cardboard canister? Nope. I really prefer to get my oatmeal in a #10 can. The cardboard canisters can get bugs.

WEEK 3
Basic Water Storage Clean, potable water is a life necessity. Our bodies need it to survive. We use it to clean ourselves, preventing illness and infection. We also use it to prepare food. Having plentiful water after a disaster cannot be overemphasized.

Experts say that we’ll need one gallon of water per person per day. To my way of thinking, that’s almost absurdly minimal. I’d suggest at least one-and-a-half to two gallons. More is always better.

The problem is that water is heavy and can be difficult to store in mass quantity. You can’t shrink it down either. It takes up a lot of space.

CALCULATE YOUR WATER NEEDS
Regardless of where you live, at a minimum, your family should have ten days’ worth of potable or purifiable water per person on hand at any time. For a family of four, that amounts to eighty gallons of water. That’s four twenty gallon water bottles. If you have limited storage space in your home, that might be the maximum you can store.

If you live in an area that’s susceptible to catastrophes like hurricanes, blizzards, or earthquakes that could disrupt water supply for up to a month, you should plan to have more water on hand, up to thirty days per person.

Discuss with your family what you can realistically store in the space you have. If you follow all the storage goals in the weeks to come, you’ll end up with about fifty-two gallons of water per person. That’s potentially enough for three full months of off-the-grid (and pipes) living. If you don’t have the space to store that much water, simply come up with a realistic, safe goal and then cut off your storage there. Don’t forget to rotate your water supply if you’re not purchasing sealed water. That’ll keep your water safe and potable.

Look back to the list you made for how much water you have stored right now. Did you include the contents of your water heater? The average water heater holds about thirty gallons or so. That’s enough to last a family of four a few days, and it’s likely already there, without any planning on your part.

How many days could you last on the water you have stored right now? Do the math, I’ll wait. If you have four people in your family and you have forty gallons stored, at two gallons per day you have enough for five days. And that’s figuring nothing more than occasional sponge baths for cleanup.

What are the best ways to store water? I like to use cleaned-out soda and juice bottles. A two-liter bottle is roughly half a gallon. I like them because they’re both easy to store and not too cumbersome to use as is. There are, of course, containers specially made for storing water. I know several discount retailers that sell seven-gallon containers in their sporting goods sections, and those containers are nice to have. Most of them have a built-in spigot, making them easy to use. But again, water is heavy, and even a seven-gallon container takes a bit of oomph to move.

You could, of course, purchase commercially bottled water. But this can be expensive, and the water isn’t much better than what’s available in many homes free from the tap. That said, for some people this might be the most feasible option.

Some folks advise that if you have the time to do so in an emergency, you should fill up your bathtub. Not a bad plan, but how many of you have bathtubs clean enough to drink from at any given time? Of course, the water from the tub could be used for other purposes such as cleaning. What you’ll want to do, though, is cover the filled bathtub to keep dust and other stuff out of the water. You can buy shower curtain liners at most dollar stores, and these would work well for that purpose. Just drape one over the tub and use books or something on the sides to keep it in place. Also, if you go this route in an emergency, use only the cold faucet tap so you don’t empty your water heater.

THE WATERBOB

There’s a product specifically designed for storing emergency water in the bathtub. The WaterBOB is a large plastic bladder that you roll out on the bottom of your tub, then fill from the faucet. It holds up to one hundred gallons and comes with a handy siphon pump for transferring the water from the bladder to pitchers or jugs. Since it’s sealed, there’s no worry about debris falling into the water.

This would provide an excellent backup to your other water storage. But it should only be considered a backup. Obviously, it’ll work only if the faucets are still running. Should you not be home at the time of the initial crisis, you might miss your window of opportunity to fill the WaterBOB. So keep storing water as instructed. You can find the WaterBOB at this website: www.waterbob.com.

STORING YOUR WATER SAFELY

Your water should be stored in an easily accessible location. A basement is OK, if you’re ready, willing, and able to carry that water up and down stairs. A better solution might be closets, pantries, that sort of thing. Someplace cool and dark is best.

Stored water also needs to be rotated regularly. Figure on a six-month schedule for rotation. Use the old water for houseplants, pets, and gardens. This doesn’t apply to commercially bottled water. Kept sealed, this water will stay fresh pretty much forever.

IMPORTANT NOTE ABOUT WATER STORAGE

As we go through each of the following sections, you’ll be instructed to continue setting aside water for each member of the family, one gallon per person per week. However, it’s also time to start rotating your supply to ensure that the water you’re storing doesn’t get stale.

Here’s what you should do. Your water should be stored in such a way that you can easily determine which bottles are the oldest. Going forward, you’ll remove one gallon from your storage and pour it into the water dish for the pets, use it for cleaning, or pour it into the garden. You’ll then replace it with two gallons of fresh water. This replaces the gallon you took out as well as adds another gallon to storage. This way, you’re constantly using up the oldest water as well as adding fresh to the stockpile.

Note: Do not use milk jugs. They’re not designed for long-term storage and degrade rather quickly, developing pinholes in them.

But if you’re storing purchased bottled water, rather than filling your own containers, there’s no need to rotate the supply. Commercially bottled water will remain fresh as long as the seals on the bottles are not broken. So, if you’re storing cases of bottled water that you’ve bought at a warehouse store or grocery store, you can skip the whole rotation thing and just concentrate on building up your supply.
 
Last edited:
WEEK 3 ASSIGNMENTS TASKS

1. Determine a water-storage goal, in terms of how long you feel you may need to provide for your own water needs in the event of a disaster. Calculate how much water you should have stored. Remember, you’ll need 1.5 or 2 gallons per person per day.

2. Work out a plan to achieve your storage goal. Begin or continue to gather containers that’ll work for your situation. Be sure they’re clean.

3. Figure out a rotation schedule. What you want to avoid is dumping large quantities of your stored water all at once. The six-month rule is a guideline, not set in stone. Use up and replenish a few gallons each week to keep your supply fresh.

SAVINGS Add $10 to your Prepper Savings Account.
TOTAL PREPPER SAVINGS ACCOUNT: _______ (should be $40 if following this guide)

WATER STORAGE
One gallon (or two 2-liter bottles) per person or a case of bottled water for the household.
TOTAL WATER STORAGE: ______ (3 gallons per person now if following this guide)

GROCERY LIST
3 cans vegetables, your choice
2 cans fruit, your choice, but stick with those packed in water or juice, rather than syrup
2 cans meat (tuna, chicken, beef), your choice
2 cans soup, not condensed (they require water)
1 jar of jelly or fruit preserves
1 jar pasta sauce
1 box or canister table salt
1 package nuts, dried fruit, or trail mix

WEEK COMPLETED Date:_____________
 
I'm wondering about what kind of notebook or binder would work best for this project. Any ideas or suggestions? A 3 ring binder would allow for additions, but pages tear out too easily. I think a notebook that is bound and would allow for individualization would be good. Maybe a composition notebook?
I am just now getting to this thread because I was knee deep in canning when it began. I’m still not finished but at least can look 👀 now. I do have a hard copy list (that needs to be updated). I have one of those folders that holds loose leaf paper with the 3 little tab things. I like it because it’s thinner than a 3 ring binder yet I can add pages if/when necessary.
 
I am just now getting to this thread because I was knee deep in canning when it began. I’m still not finished but at least can look 👀 now. I do have a hard copy list (that needs to be updated). I have one of those folders that holds loose leaf paper with the 3 little tab things. I like it because it’s thinner than a 3 ring binder yet I can add pages if/when necessary.
I do find that my inventory list has not been well kept up. I think that it is basically done, but I don't have everything on it.
 
I do find that my inventory list has not been well kept up. I think that it is basically done, but I don't have everything on it.
Not to derail the thread, but it does apply here. About 2 years ago (maybe not quite) I did a complete inventory of everything we have. I did it room by room which was helpful. Some rooms like the living room, bathroom and bedroom are easy. The storage areas are the challenge. Of course I’ve added things and used some things so whatever number I have is now inaccurate. But, it does seem slightly less daunting knowing that there are rooms I con just glance through the list and verify. Having “created” room for things makes it difficult for some things to be easily counted.
 
I also was raised by people who were late teens, young adults of the late 1930s, to mid 1940s... So a look ahead, plan ahead, don't waste anything attitude was a life style.. Starting my personal prepping journey and in pretty good shape by the time Y2K came and went... This when my family was pre teen.. My personal thought as Y2K came and went as pretty much a ..non event.. did us preppers a favor by not making prepping ...catch on... and prepping easily forgotten by many... This another thread...

Anyway... Down loaded, labeled, saved this attachment for later reading... Thanks for sharing...
At a time I also kept a number of 3 ring binders.. Some labels were.. Good Idea Notebook.. This for tractor implements and other DIY farm inventions.. Just Add Water, Meals in a Jar recipe notebook. This for recipes for dry mixes to make freeze proof, campfire meals.. The JAW notebook was a thick one as it also contained a number of other recipes and instructions.. Like how to make wild berry jams, BBQ sauce recipes, and the like... One of my favorites was a kind of universal orange, lemon, lime, zucchini bacon hot pepper marmalade...
I was raised by grandparents who raised their children through the Great Depression. It wasn't called prepping. It was living life to survive. that included: large gardens, lots of canning, well stocked pantries, freezer full of meat. They also hired little work done. They were very self sufficient.

I have been interested in preparedness for well over 40 years, and have been reading, studying, and learning most of my life as well as doing my best to be prepared.
 
I also was raised by people who were late teens, young adults of the late 1930s, to mid 1940s... So a look ahead, plan ahead, don't waste anything attitude was a life style.. Starting my personal prepping journey and in pretty good shape by the time Y2K came and went... This when my family was pre teen.. My personal thought as Y2K came and went as pretty much a ..non event.. did us preppers a favor by not making prepping ...catch on... and prepping easily forgotten by many... This another thread...

Anyway... Down loaded, labeled, saved this attachment for later reading... Thanks for sharing...
At a time I also kept a number of 3 ring binders.. Some labels were.. Good Idea Notebook.. This for tractor implements and other DIY farm inventions.. Just Add Water, Meals in a Jar recipe notebook. This for recipes for dry mixes to make freeze proof, campfire meals.. The JAW notebook was a thick one as it also contained a number of other recipes and instructions.. Like how to make wild berry jams, BBQ sauce recipes, and the like... One of my favorites was a kind of universal orange, lemon, lime, zucchini bacon hot pepper marmalade...
I like that. I keep two 3-ring binders. One labeled Flora and 1 Fauna. I have things pertaining to trees, plants and foraging in the one and in the other, anything that has to do with critters of any kind. It seems like articles and such need a place.
 
Week 4! Already!
Maybe some of us could call it Step 4? When the people who are hysterical, new preppers are asking "Where do I start?" This could be it. Maybe some can't keep up week by week, but could do one step at a time.

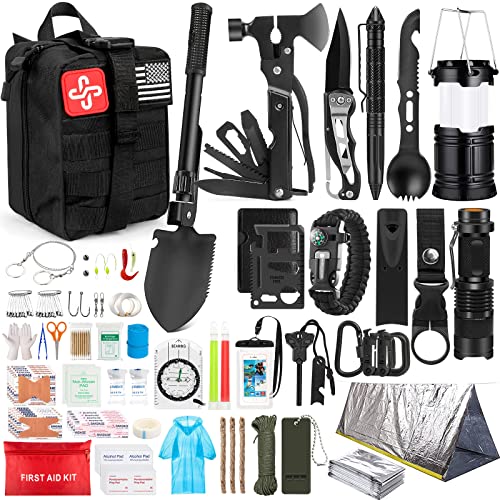
WEEK 4 Get Home Bags Assembling a Get Home Bag, often called a Bug Out Bag, a Get Out Of Dodge (G.O.O.D.) Bag, or just a backpack survival kit, is often one of the first things a new prepper does as part of his or her journey to preparedness.

But I deliberately waited to present this lesson until I addressed some of the other basics. Quite simply, you’re more likely to need your supplies at home than when you’re out and about.

With that said, a Get Home Bag is a vital component of your plan, and it’s time to put one together if you haven’t already done so. The first step is not, as some may think, to purchase a backpack. Instead, you want to work in reverse. First, gather what you feel you should have in a Get Home Bag, then find a suitable pack for the contents. Otherwise, you run the risk of either buying a pack that’s too large, which then psychologically compels you to fill it, or buying one that’s too small to carry what you truly need.

A Get Home Bag has one purpose: to get you from Point A to a safe location, on foot if need be, by providing for your basic needs. These needs include water, food, first aid, and shelter/warmth. Most experts suggest having enough supplies to last you three days or so.

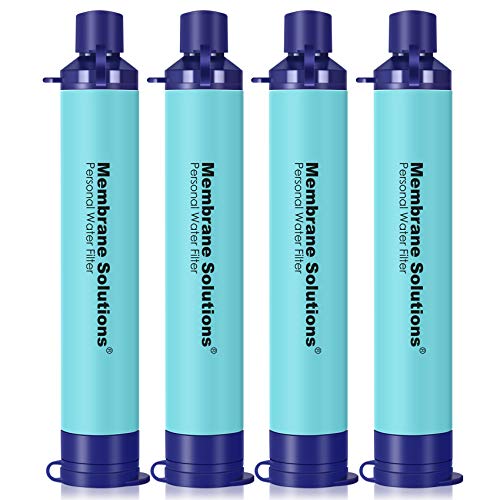
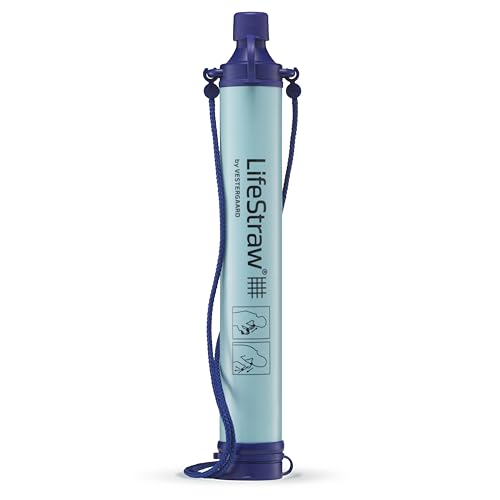
Water is one of the most important needs to be met. But water is heavy and difficult to transport in large quantities. A reasonably fit person can probably carry two liters of water without too much trouble. It’s best to split this into two bottles. First, this allows you to balance the load, and second, should you come across a source of water you’ll want and probably need to refill your supply. With two bottles, you can treat “new” water in one bottle while still drinking from the second. What’s the best way to treat found water? A supply of water-purification tablets will suffice in most cases. There are also water bottles available with built-in filtration you may want to consider. Berkey does make a small, portable water filter that, while pricey, cannot be beat for quality.

Next up is food. For your Get Home Bag, stick to things that require little to no preparation. Since you can’t predict the circumstances in which you’ll need to rely on your kit, it’s best not to worry about cooking. Remember, this is one time when you want to pile up calories, so forget the diet. Calories are what fuels the body. Stock your kit with dried fruit, nuts, granola bars, crackers with peanut butter, hard candy, and protein bars. Some people like to store MREs (Meals Ready to Eat), but I find them too bulky for most folks. The idea here isn’t to put together a three-course meal but to stay alive.

Your first aid kit should be extensive without being too large to handle comfortably. Think about the most common reasons to use a first aid kit. For scrapes, bruises, stomach upset, strains/sprains, slivers, blisters, you’ll want to have plenty of supplies like adhesive bandages, pain relievers, antibiotic ointment, gauze, elastic wrap, tweezers, alcohol swabs. Don’t forget the over-the-counter remedies for nausea and diarrhea. Things will be bad enough if you’re trying to find your way home on foot, without having to deal with a case of the squirts.

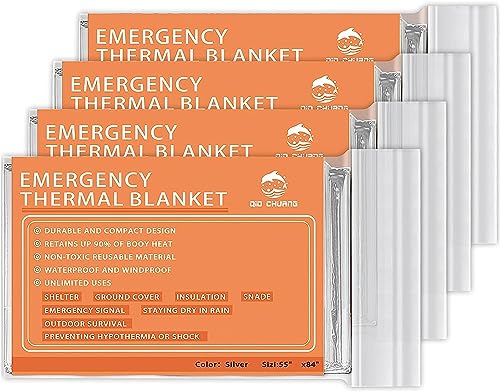
Warmth and shelter are very important needs to be met. Hypothermia can kill, and it’ll sneak up on you. Be proactive on that front. Carry a few space blankets. I’ve found that the ones made by Heatsheets are among the highest quality. They’ll help you retain body heat as well as ward off the elements. A wool cap will keep you warm even while wet. Gloves are essential during the colder months. Put together a fire-making kit as well, including butane lighters, strike-anywhere matches, and ready-to-use tinder like dryer lint. Seal those things 23 in a plastic bag to keep them from getting wet. With luck, you won’t have to spend more than a night or two outside, but even a single night can be a trial without a campfire.

There are several other odds and ends to include in your Get Home Bag.
❑❑ A good-quality, sharp knife
❑❑ Insect repellent
❑❑ Sunscreen
❑❑ Sunglasses and a wide brim hat
❑❑ Hand sanitizer, which works great as a fire starter because of the high alcohol content
❑❑ Toilet paper (take out the cardboard tube and crush the roll flat)
❑❑ Paracord. Many uses, from helping build a temporary shelter to lashing items to your pack
❑❑ Flashlight or headlamp. Having both is ideal. Don’t forget extra batteries.
❑❑ Small portable radio. Depending on the emergency, it’ll probably be beneficial to gather news on the situation.
❑❑ Bandanna. Several uses from a sweat rag to tourniquet.
❑❑ Extra socks and underwear. Both for comfort and hygiene.
❑❑ Empty, extra ziplock plastic bags. These have many uses.
❑❑ Compass and maps of your area
❑❑ Cash and coins. Again, you have no way of knowing exactly what the crisis may be that results in you having to rely on your Get Home Bag. Could be you’ll come across a working vending machine or pay phone. You may also need to pay for transportation if that becomes an option.
❑❑ Self-defense weapon(s). If you’re on foot during a disaster, there’s a significant chance that someone may try to take what you have.

LET THERE BE LIGHT One of the best flashlights I’ve come across is the Maxxeon WorkStar® 330 Hunter’s Pocket Floodlight Just a bit longer than a Mini Maglite, it uses three AAA batteries. With just a small LED bulb, it puts out around 140 lumens. If you’re like me and have no real, quantifiable way to know just how bright that is, let’s just say you don’t want to shine this in your eyes. You’ll be nearly blinded for a while if you’re that foolish. Find it at www.maxxeon.com.

Now for a bag to carry all of it. A backpack is usually the most efficient option. Find one that’s both comfortable and durable. This is one case where you probably don’t want to just stuff everything into a pack you found during the back-to-school sale at Walmart. Instead, you want something with a frame to help balance the load across your hips and back. Put everything into your pack and walk around with it for a while. Get used to the weight as well as to how it sits on your body. Make adjustments as necessary.

Another, less attractive, option is a duffel bag. While better than nothing, it’ll cause you to walk unbalanced, increasing the chance of a stumble. I know a few people who use wheeled luggage, like the small suitcases you might use as an airline carry-on. I’m not sold on those—they aren’t meant to be used on rough terrain, and if you have to carry them, they’re pretty darn heavy.

THE SHEMAGH SCARF You might consider adding a shemagh scarf to your bag.

This traditional Arab head scarf is tremendously useful. It’s much larger than a typical bandanna, at around forty square inches. You can use it as a cold-weather scarf, a head wrap, a face mask, or a crude water filter. You can even wrap a few items inside it and tie it to a stick to complete that hobo costume! In all seriousness, American troops stationed in the Middle East quickly discovered just how useful a shemagh scarf is and carry one everywhere. You can find these scarves in over a dozen colors and prints, even camouflage if that’s your thing.

Organizing the gear in the Get Home Bag is important. You don’t want to have to dump out all the contents just to find your sunscreen. One great way to organize the supplies is to use smaller bags and pouches within the pack. I get most of mine from www.SurvivalResources.com. This company offers a wide range of handy pouches, tins, and other containers for keeping things together in your pack.

The Get Home Bags should be stored in your vehicle(s), given that the purpose of them is to get you from elsewhere back home. They aren’t going to do you any good if they’re sitting in the closet at home and disaster strikes while you’re at work. Keep them in the trunk or the backseat, whichever is more convenient. If you opt for the backseat, you may wish to use an old blanket to cover the Get Home Bag, so as to avoid tempting a thief. Plus, that guarantees you’ll have a blanket in the car in case you get stranded, right?
 
Last edited:
I'm wondering about what kind of notebook or binder would work best for this project. Any ideas or suggestions? A 3 ring binder would allow for additions, but pages tear out too easily. I think a notebook that is bound and would allow for individualization would be good. Maybe a composition notebook?
I use a 3" three ring binder. I put the paper pages in plastic sheet protectors so they are better protected. The dividers are categorized by room, so I know where to find things if need be. I believe I even have a Bug Out check list, to be sure that nothing important is left behind.
 
Week 4 tasks! I'm glad to see the totals. I have been busy and have done little. But the day will come when I will be able to go shopping. I want this list written or printed so I can know what I need.

WEEK 4 ASSIGNMENTS TASKS

Put together a Get Home Bag for each member of your family. You probably won’t need to go out and buy a ton of new stuff. Just use what you have around the house, then upgrade when finances allow. It’s important to have a kit for each person so you have enough supplies for everyone. Obviously, small children won’t be able to carry a huge pack, so limit the contents of theirs to the lighter stuff and pack extra food in the adult packs.

SAVINGS Add $20 to your Prepper Savings Account.
TOTAL PREPPER SAVINGS ACCOUNT:

WATER STORAGE One gallon (or two 2-liter bottles) of water per person or one case of bottled water for the household.
TOTAL WATER STORAGE:

GROCERY LIST
3 cans vegetables, your choice
2 cans fruit, your choice, but stick with those packed in water or juice, rather than syrup
1 can chili or stew, your choice
1 package gravy mix, your choice
1 box baking mix, preferably the type that doesn’t require eggs, milk, or other ingredients
1 box (12 packages) of ramen noodles
1 lb white rice
WEEK COMPLETED Date:_____________

MONTH ONE TOTALS
You’ve made it through your first month of prepper planning! This is what you should have learned and what you should have stored.
TASKS
❑ Created master lists of various categories of supplies to give you a good idea of where you stand
❑ Begun clearing out unwanted or unneeded items in the home, to make room for necessary supplies
❑ Started your food and water storage plans
❑ Assembled Get Home Bags for each member of the family

PREPPING SAVINGS
❑ You should have $60 set aside for future prepping purchases

WATER
❑❑ You should have at least four gallons of water for each member of the family

GROCERIES
❑❑ 12 cans of vegetables
❑❑ 8 cans of fruit
❑❑ 4 cans of meat
❑❑ 4 cans of soup
❑❑ 2 cans of chili or stew
❑❑ 2 packages or jars of gravy mix
❑❑ 1 box baking mix
❑❑ 1 box (12 packages) of ramen noodles
❑❑ 1 pound white rice
❑❑ 1 jar of jelly or fruit preserves
❑❑ 1 jar pasta sauce
❑❑ 1 canister table salt
❑❑ 1 package nuts, dried fruit, or trail mix
❑❑ 1 jar of peanut butter
❑❑ 1 box of granola bars, protein bars, or equivalent
❑❑ 1 gallon cooking oil
❑❑ 1 canister oatmeal or one box of flavored instant oatmeal
❑❑ 1 treat, such as a bag of chips or hard candy
 
Last edited:
1 box baking mix, preferably the type that doesn’t require eggs, milk, or other ingredients

We have BOB's for all family members and the dog. We also have a food bag, a medical bag, and a security bag. All can be grabbed in a heartbeat if need be.

Have you ever made a cake using cake mix and a 12 oz. can of soda? No milk. No eggs. It works surprisingly well. I just made a chocolate cake using root beer. You couldn't taste any of the root beer, but it made a fantastic chocolate cake. :dunno: Put the cake mix and the soda into a bowl, and whisk it into a badder. Pour the badder into a pan and bake for 30-40 minutes at 350 degrees.
 
I use a 3" three ring binder. I put the paper pages in plastic sheet protectors so they are better protected. The dividers are categorized by room, so I know where to find things if need be. I believe I even have a Bug Out check list, to be sure that nothing important is left behind.
I think the Bug out check list is important. What could be on it? To go bags, documents binder, ??

I also think being able to keep things together in the garage, prepping room or a closet would be helpful. We can have a bug out bag, as discussed earlier. But we can have a few other bags such as kitchen bag, sleep bags, etc.

I think a kitchen bag ready to go would be helpful if we end up not being able to go home for a while, and in some instances, if ever. A small rolling suitcase that contains things like kitchen towels, small cook stove, dish soap, dish pans, camping kind of dishes and pots and pans, etc. When I've been going through and reorganizing my spices, I realized that I had jars that I could set up as spares that could go into a spare tackle box that I have. It could have small amounts of salt, pepper, garlic powder, baking powder, baking soda, sugar, corn starch, oil as well as other kitchen ingredients that would fit. I haven't started this project yet, but it is on my list to do.
 
Have you ever made a cake using cake mix and a 12 oz. can of soda? No milk. No eggs. It works surprisingly well. I just made a chocolate cake using root beer. You couldn't taste any of the root beer, but it made a fantastic chocolate cake. :dunno: Put the cake mix and the soda into a bowl, and whisk it into a batter. Pour the batter into a pan and bake for 30-40 minutes at 350 degrees.
I have not, but what a great idea, especially if a person had soda but no milk or eggs. Those days could be coming. I am not a big soda drinker, but often have some. I probably have coke in the fridge that is a few years old.
 
That gravy mix? Yuck! I suppose it would be okay to have it for some people. Its the kind of thing I avoid because of my migraine history.

I'm going to look for gluten free baking mix.

Because of daughter's gluten allergy, I prefer to purchase rice noodle packets for the ramen noodles. They are a little more expensive than ramen, but they are good.
https://www.amazon.com/Thai-Kitchen...dc-9d9f-457ab6b4ce13&pd_rd_i=B07JW7T63F&psc=1
 
I think the Bug out check list is important. What could be on it? To go bags, documents binder, ??

Things you might need that aren't in your BOB. Blankets, pillows, maintenance medications, charging devices for electronics. Things you may use every day, but don't have a second or back-up you can store.

We have a small, travel size Weber Kettle that has all the kitchen supplies stored inside. It is still in the original box, and kept with the butane stove in the garage. We also have a camping duffel bag that has ALL of the kitchen supplies, pots, pans, bowls, utensils, dishes, silverware, towels. It would be difficult to carry, but could be thrown in the car.
 
I have not, but what a great idea, especially if a person had soda but no milk or eggs. Those days could be coming. I am not a big soda drinker, but often have some. I probably have coke in the fridge that is a few years old.

I made a chocolate cake with Coca Cola, and it turned out fine. Put a can of icing on the list. I am not very good at making icing with cocoa.
 
I made a chocolate cake with Coca Cola, and it turned out fine. Put a can of icing on the list. I am not very good at making icing with cocoa.
I think this is a great idea. I have a Coleman oven to go over a stove. It is not large, so it needs smaller pans, which I have. I think two cake pans of this size would be necessary due to the size.
 
Blankets, pillows, maintenance medications, charging devices for electronics. Things you may use every day, but don't have a second or back-up you can store.
Because I spend so many nights away from home housesitting, I can tell you that charging devices are one of my biggest struggles. I have a bag that I take with electronics--laptop, DVD player, external hard drive, etc. I try to keep the chargers in there, but it seems that I am often missing one. And they do stop working sometimes, so extra chargers is helpful.

I also have a bathroom bag that I keep in my suitcase with the basic clothing. Bathroom has the things that I need daily for the bathroom. Suitcase is almost always ready to go. I use it enough that it is helpful for me to keep it packed up, except maybe a few extra changes of clothing. I do keep pajamas, socks and underwear in there as well.
 
Last Summer we took a vacation to Florida, and got stuck on the way back. Had to spend the night in Atlanta, and we had already checked our luggage through. I was a little better prepared with what I had in my backpack, but my wife was kind of left in the lurch. I felt badly that I had not prepped us both for this eventuality. Since then we have added this clothing roll to our carry-ons. I added a travel toothbrush and toothpaste and put it all in a zip lock bag.

 
I'm wondering about what kind of notebook or binder would work best for this project. Any ideas or suggestions? A 3 ring binder would allow for additions, but pages tear out too easily.
000vvv000
I also use page protectors with some heavily used, often used documents in my 3 ring binders and replace protectors and documents as needed.. Hard copy info takes supplies and maintance, however it is more durable as I have made one wrong mouse click and lost a lot of stuff...
 
Last Summer we took a vacation to Florida, and got stuck on the way back. Had to spend the night in Atlanta, and we had already checked our luggage through. I was a little better prepared with what I had in my backpack, but my wife was kind of left in the lurch. I felt badly that I had not prepped us both for this eventuality. Since then we have added this clothing roll to our carry-ons. I added a travel toothbrush and toothpaste and put it all in a zip lock bag.


Daughter went on a mission trip to Honduras many years ago and her suitcase never made it. She was stuck wearing the same clothes for days, while she and her group were building a house for a family. She vowed that she would never check luggage again. When she has traveled since, she takes a carry on and says she would much rather wash clothes and let them dry than to wear the same things for days. If a person travels enough, you figure out how to do better with less. She uses an electric toothbrush, but left it home and took a normal one as an example.
 
WEEK 5 Evacuation Kits
The ideal in most situations is what we refer to as “sheltering in place.” Unless you have a fully stocked retreat elsewhere, home is generally where all your preps are located. You should plan to remain at home unless and until such a time that you’re unable to do so.
There are many reasons that can cause you to evacuate at a moment’s notice. In my area, there have been several gas main breaks in the last year or so. While residents are typically evacuated for only a short period of time, one never knows how those situations may play out. A couple of years back, a huge fire broke out at a factory a couple counties away from where I live. Quite a bit of toxic smoke and debris were blanketing the area, and residents were forced to flee. Many of them weren’t allowed to return for at least a day or two.

In situations like that, you have to get on the road and away from the area quickly.
Because you won’t have time to go through the house and neatly pack your belongings, you should prepare an evacuation kit.
While similar in content, an evacuation kit differs from your Get Home Bags in a few ways. A Get Home Bag is designed to meet your needs while traveling from point A to home, on foot if need be. Thus the contents are more about food, water, and shelter. The evacuation kit, on the other hand, presupposes that you have someplace to go (family member’s home, hotel, etc.) and stay for a few days. The kit isn’t meant for roughing it but rather to give you the materials and tools you’ll need to be away from home for a while.

The evacuation kit should be kept in an accessible location within the home, such as a closet. Put together one kit for each family member, though you might not need separate packs for each person. Assuming that you’ve already put together Get Home Bags and are keeping them in your vehicles, the contents of those will supplement what you have in your evacuation kits.

Here’s what you should have in your evacuation kits.
❑❑ At least two complete changes of clothes for each person, with extra socks and underwear as well. If you can swing it, include an extra pair of shoes for each person. If you’re roused out of bed in the middle of the night, some or all of you may end up shoeless on your way out the door.
❑❑ Maps of the area, including planned routes of evacuation and a list of local emergency shelters
❑❑ Money (cash, coins, credit cards)
❑❑ Copies of important papers, such as insurance policies, vehicle and home ownership, pet vaccination records, identification
❑❑ Copies of treasured family photos. You could scan them in and save them on a thumb drive. Include current photos of every family member and family pet. For pictures of pets, the ideal would be pictures of you with your pet. That’ll go a long way toward proving ownership if that becomes an issue.
❑❑ Snacks like nuts and dried fruit, granola bars, and crackers
❑❑ At least one, preferably two, water bottles for each person. Don’t forget water-purification tablets or another means of purifying water, just in case the disaster causes problems with the water supply.
❑❑ Small first aid kit and an extra supply of any prescription medications that may be necessary 28
❑❑ Hygiene supplies, such as toothbrushes, toothpaste, deodorant, bar of soap, and a washcloth. A roll or three of toilet paper is a good idea, as are extra feminine hygiene supplies.
❑❑ Flashlights will be welcome if the evacuation is at night and you end up on foot. Headlamps are even better.
❑❑ A portable radio, either battery or crank powered, will help you keep informed of what’s going on
❑❑ Extra batteries for any devices in the kit that require them Remember, the idea behind an evacuation kit is to provide for your needs while away from home for a few days. It is meant to be supplemented by your Get Home Bags if the duration of the evacuation is longer than that.
 
WEEK 5
ASSIGNMENTS TASKS

1. Assemble an evacuation kit for each family member. Use common sense: you won’t need to include a separate portable radio for each person. The overall kit for each person will likely end up being fairly small, and you can probably pack several kits into one or two larger bags. Keep the bag(s) in a hall closet and make sure each family member knows where they are so they can be grabbed quickly on the way out the door.

2. Plan ahead for potential evacuation. Talk with family members about the possibility of staying with them for a few days, and vice versa. Determine where emergency shelters are commonly opened in your area, such as churches and schools. While these shelters are typically the last resort for the prepper, it’s an option to be explored. The point is, plan out where you could go and how you’d get there.

SAVINGS
Add $20 to your Prepper Savings Account.
TOTAL PREPPER SAVINGS ACCOUNT:_______

WATER STORAGE
One gallon (or two 2-liter bottles) of water per person or one case of bottled water for the household.
TOTAL WATER STORAGE: ______

GROCERY LIST
3 cans vegetables, your choice
2 cans fruit, your choice, but stick with those packed in water or juice, rather than syrup
2 cans meat (tuna, chicken, beef), your choice
2 cans soup, not condensed (they require water)
1 jar instant coffee (even if you don’t drink coffee, this is a great barter item)
1 package of dry soup mix
1 bag of cornmeal

WEEK COMPLETED _________
 
Weedy: I didn't mean to hijack your thread, but week 5 Evacuation Kits, fits right in with the thread I just started on How Prepared Are You? I just happened to watch a You Tube video and thought it would be good to share with the group. I think we will all have the same opinion of the family in the video.

The best explanation for Evacuation (or maybe Bugging Out) I have seen is an acronym REDOUT.

R - Resouces of lack of. If you don't have them you better leave.
E - Environmental threats. Self explanatory.
D - Destination. If you don't have one then don't leave. You are at your destination
O - Overwhelming force. If the insane mob is heading your way probably best to leave
U - Unprepared for the situation
T - Threat is growing

We have narrowed things down to four bags: A BOB for each family member and the dog; a food bag, medical bag; and an ARK, Armed Response Kit. If the situation was bad enough we do have an INCH bag (I'm Never Coming Home), a tent and camping duffel bag that would sustain us for some time. We have everything on the checklist.

It is a great reminder to see all of these lists on a regular basis. Thanks for keeping up with the thread. :thumbs:
 
For a time I kept a type of ....stash, cache.... at my big brothers place... It was a used, clean, dry 32 gallon plastic trash bin with lid and wheels.. Cheap, weather, dust, rodent proof, easy to move when kept in his garage or shed.. Being left with a trusted person it only had a zip tie to keep the lid secure..

Anyway... Kind of along side the video posted in post #53 I used pillow cases to organize a change of clothes.. I'm a big guy and could fit a complete change of clothes folded or rolled in a pillow cast that took up less than half a cubic foot.. Each roll being a bit less than 12x12x6" with some extras.. Long sleeve shirt, T shirt, jeans, 2 shorts, 2-3 pair socks, bandana, handkerchief... Used pillow cases were 25 cents at the thrift store..
 
Back
Top